こちらの記事の続きです。 programming-gogogogo.hatenablog.com
今回はVue.jsでDjango REST FrameworkのAPIからデータを取得し画面表示する実装したいと思います。
DRFがloalhost:8000で動作している状態で、Vue.jsのコードを以下のように編集し、APIのエンドポイントを変更してみました。
vue-app/src/components/HelloWorld.vue
<template>
  <div>
    <h1>Users</h1>
    <ul>
      <li v-for="user in users" :key="user.id">{{ user.name }}</li>
    </ul>
  </div>
</template>

<script>
export default {
  data() {
    return {
      users: []
    }
  },
  mounted() {
    // const apiURL = 'https://jsonplaceholder.typicode.com/users';
    const apiURL = 'http://localhost:8000/api/users/'; // 追加

    fetch(apiURL)
      .then(response => response.json())
      .then(data => {
        this.users = data;
      })
      .catch(error => console.error(error));
  }
}
</script>

<style>

</style>
するとCORSエラーになりました。 おそらくAPI側でCORSの設定が必要だと思われるので、ChatGPTに質問してみました。
入力
How can i avoid cors eorror with Django REST Framework?
出力
To avoid the CORS (Cross-Origin Resource Sharing) error when sending a request from a Vue.js server to a Django REST Framework (DRF) server running on a Docker container, you need to enable CORS on the DRF server.
Here are the steps to follow:
Install the django-cors-headers package in your Django project. You can do this by running the following command in the container where the Django project is running:
Copy code pip install django-cors-headers Add corsheaders to the INSTALLED_APPS list in your Django project's settings.py file:
INSTALLED_APPS = [
    # ...
    'corsheaders',
    # ...
]
Add the corsheaders.middleware.CorsMiddleware middleware to your Django project's middleware list in settings.py:
MIDDLEWARE = [
    # ...
    'corsheaders.middleware.CorsMiddleware',
    'django.middleware.common.CommonMiddleware',
    # ...
]
Add the CORS_ORIGIN_ALLOW_ALL setting to your Django project's settings.py file and set it to True:
CORS_ORIGIN_ALLOW_ALL = TrueThis will allow any origin to access your DRF server's resources. If you want to allow only specific origins, you can set CORS_ORIGIN_WHITELIST to a list of allowed origins.
For example, to allow requests from http://localhost:8080 and http://localhost:3000, add the following line to settings.py:
CORS_ORIGIN_WHITELIST = [
    'http://localhost:8080',
    'http://localhost:3000',
]
Save your changes to settings.py and restart your DRF server.
With these steps, your DRF server should now allow requests from your Vue.js server without returning a CORS error.
上記を参考にコマンドを実行します。
pip install django-cors-headers
次にsettings.pyを編集します。
project_name/project_name/settings.py
INSTALLED_APPS = [
    "django.contrib.admin",
    "django.contrib.auth",
    "django.contrib.contenttypes",
    "django.contrib.sessions",
    "django.contrib.messages",
    "django.contrib.staticfiles",
    "rest_framework",
    "app_name",
    "corsheaders", # 追加
]


MIDDLEWARE = [
    "django.middleware.security.SecurityMiddleware",
    "django.contrib.sessions.middleware.SessionMiddleware",
    "django.middleware.common.CommonMiddleware",
    "django.middleware.csrf.CsrfViewMiddleware",
    "django.contrib.auth.middleware.AuthenticationMiddleware",
    "django.contrib.messages.middleware.MessageMiddleware",
    "django.middleware.clickjacking.XFrameOptionsMiddleware",
    "corsheaders.middleware.CorsMiddleware", # 追加
    "django.middleware.common.CommonMiddleware", # 追加
]


CORS_ORIGIN_WHITELIST = [
    'http://localhost:8080', # 追加
]
ORIGINはVueが動作しているlocalhost:8080のみにしました。
DRFを再度起動するとVueでも正常にデータが取得できました。

次は新規ユーザー作成処理を実装してみたいのChatGPTに実装方法を質問しました。
入力
I already have a Django REST Framework API server that has User model which has two field name and email. How can I send POST request to that API server from Vue.js client. I also want to use JavaScript fetch API (not axios). Could you give me sample code of that?
出力
Sure! Here's an example code snippet to send a POST request to a Django REST Framework API server with JavaScript's Fetch API from a Vue.js client:
fetch('http://your-drf-api-url.com/api/users/', {
  method: 'POST',
  headers: {
    'Content-Type': 'application/json'
  },
  body: JSON.stringify({
    name: 'John Doe',
    email: 'john.doe@example.com'
  })
})
.then(response => response.json())
.then(data => console.log(data))
.catch(error => console.error(error));
In this example, we're sending a POST request to the /api/users/ endpoint of the DRF API server at http://your-drf-api-url.com. The fetch function takes two arguments: the URL of the API endpoint and an options object. The options object specifies the method (POST), the headers (we're setting the Content-Type header to application/json), and the body of the request (we're sending the name and email fields as JSON).
After sending the request, we're handling the response by converting it to JSON with the json method, logging the data to the console, and catching any errors with the catch method.
Note: You'll need to replace http://your-drf-api-url.com with the URL of your DRF API server, and you can change the name and email fields in the body object to the values you want to send in the POST request.
上記だとVue.jsのscript部分だけだったのでtemplateの部分についても聞いてみました。
入力
Could you give me sample code of Vue.js template section? I want two textbox that can be contain name and email.
出力
Sure! Here's an example Vue.js template that includes two textboxes for name and email:
<template>
  <div>
    <label for="name">Name:</label>
    <input type="text" id="name" v-model="name">

    <label for="email">Email:</label>
    <input type="text" id="email" v-model="email">

    <button @click="createUser">Create User</button>
  </div>
</template>
In this example, we're using the v-model directive to bind the name and email data properties to the values of the textboxes. This means that when the user types in the textboxes, the name and email properties of the Vue.js component are automatically updated.
We're also including a "Create User" button that calls the createUser method when clicked. You can use the @click directive to bind a function to the button's click event.
Note: You'll need to define the name and email data properties in your Vue.js component's data object, and define the createUser method to handle the POST request. You can refer to my previous answers for examples of how to do this.
上記を参考にしてvue-app/src/components/HellowWorld.vueを編集してみました。
<template>
  <div>
    <h1>Users</h1>
    <ul>
      <li v-for="user in users" :key="user.id">{{ user.name }}</li>
    </ul>
    <hr>
    <div>
      <h1>Add New User</h1>
      <label for="name">Name:</label>
      <input type="text" id="name" v-model="name">
      <br><br>
      <label for="email">Email:</label>
      <input type="text" id="email" v-model="email">
      <br><br>
      <button @click="createUser">Create User</button>
    </div>
  </div>


</template>

<script>
export default {
  data() {
    return {
      users: []
    }
  },
  mounted() {
    const apiURL = 'http://localhost:8000/api/users/';

    fetch(apiURL)
      .then(response => response.json())
      .then(data => {
        this.users = data;
      })
      .catch(error => console.error(error));
  },
  createUser() {
    const apiURL = 'http://localhost:8000/api/users/';
    fetch(apiURL, {
          method: 'POST',
          headers: {
            'Content-Type': 'application/json'
          },
          body: JSON.stringify({
            name: 'John Doe',
            email: 'john.doe@example.com'
          })
        })
        .then(response => response.json())
        .then(data => console.log(data))
        .catch(error => console.error(error));
  }
}
</script>

<style>

</style>
この状態でブラウザを開くとテキストボックス自体はできていますが、コンソールで「nameとemailプロパティが定義されていないけどレンダリング時にアクセスされている」というエラーが出ていました。

たぶんVueのscriptの部分のdata()で初期値を定義する必要があった気がしますので、ChatGPTに質問してみました。
入力
I got an error which says "Vue warn]: Property "email" was accessed during render but is not defined on instance. " with below code. Tell me what is wrong.
Users
- {{ user.name }}
Add New User
出力
The error message you are seeing suggests that the email property is not defined on the Vue.js component's instance. Looking at your code, it appears that you have not defined the name and email properties in your Vue.js component's data object.
To fix this issue, you can add name and email properties to the data object of your component, like this:
export default {
  data() {
    return {
      users: [],
      name: '',
      email: ''
    }
  },
  // ...
}
This will define name and email as data properties of your component, and allow you to bind them to the input fields in your template using the v-model directive.
Once you have defined the name and email properties, you should be able to use them in your createUser method to send the POST request to your API server.
回答にあるようにdata()内でnameとemailを追記し再度ブラウザにアクセスするとプロパティが定義されており、入力した値が反映されることをchromeの拡張機能で確認できました。

しかし、値を入力してCreate Userボタンを押してもcreateUser関数が実行されませんでした。
Vue.jsの公式ドキュメントを読んでみると以下のページが参考になりそうでした。 https://vuejs.org/guide/essentials/event-handling.html#method-handlers
サンプルコードとして以下がありました。
data() {
  return {
    name: 'Vue.js'
  }
},
methods: {
  greet(event) {
    // `this` inside methods points to the current active instance
    alert(`Hello ${this.name}!`)
    // `event` is the native DOM event
    if (event) {
      alert(event.target.tagName)
    }
  }
}
どうやらmethodsオブジェクトに関数を定義する必要があるようです。
vue-app/src/components/HelloWorld.vueを以下のように修正しました。
<template>
  <div>
    <h1>Users</h1>
    <ul>
      <li v-for="user in users" :key="user.id">{{ user.name }}</li>
    </ul>
    <hr>
    <div>
      <h1>Add New User</h1>
      <label for="name">Name:</label>
      <input type="text" id="name" v-model="name">
      <br><br>
      <label for="email">Email:</label>
      <input type="text" id="email" v-model="email">
      <br><br>
      <button @click="createUser">Create User</button>
    </div>
  </div>


</template>

<script>
export default {
  data() {
    return {
      users: [],
      name: '',
      email: ''
    }
  },
  mounted() {
    const apiURL = 'http://localhost:8000/api/users/';

    fetch(apiURL)
      .then(response => response.json())
      .then(data => {
        this.users = data;
      })
      .catch(error => console.error(error));
  },
  methods: {
    createUser() {
    const apiURL = 'http://localhost:8000/api/users/';
    fetch(apiURL, {
          method: 'POST',
          headers: {
            'Content-Type': 'application/json'
          },
          body: JSON.stringify({
            name: 'John Doe',
            email: 'john.doe@example.com'
          })
        })
        .then(response => response.json())
        .then(data => console.log(data))
        .catch(error => console.error(error));
  }
  }
}
</script>

<style>

</style>
すると、Create Userボタンを押してcreateUser関数が実行され新規にユーザーを追加できるようになりました。

ただ、リクエストのボディにJohn Doeなどの文字列をハードコーディングしているので、次はテキストボックスに入力した値が反映されるように修正したいと思います。
先ほどのサンプルコードを読むとtemplateで入力した値をscript内でthis.プロパティ名と書いて参照できそうなので以下のようにcreateUser関数を修正しました。
methods: {
    createUser() {
    const apiURL = 'http://localhost:8000/api/users/';
    fetch(apiURL, {
          method: 'POST',
          headers: {
            'Content-Type': 'application/json'
          },
          body: JSON.stringify({
            name: this.name,
            email: this.email
          })
        })
        .then(response => response.json())
        .then(data => console.log(data))
        .catch(error => console.error(error));
    }
  }
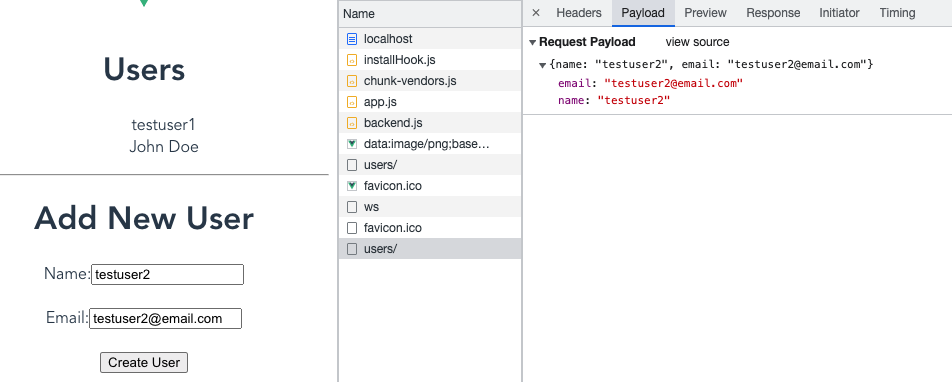
修正後、ブラウザにアクセスしてCreate Userボタンを押すと以下のようにリクエストのボディに入力した値が反映されていることが確認できました。
次にそれぞれのユーザーの詳細ページにlocalhost:8080という感じでアクセスできるようにしたいと思います。
Vueでのルーティングが必要になるので多分Vue Routerを使うかと推測しつつChatGPTに質問してみます。
入力
I have Vue.js page which shows all users at one page. I want to add new page which shows each users details and have update and delete button for that user. I think URL of that detail page would be like
localhost:8000/users/1. Could you give me sample code for that vue file?
出力
Sure, here's an example of how you could create a new Vue.js component to display a user's details and allow updating and deleting that user:
<template>
  <div>
    <h1>User Details</h1>
    <p><strong>Name:</strong> {{ user.name }}</p>
    <p><strong>Email:</strong> {{ user.email }}</p>
    <br>
    <button @click="editUser">Edit</button>
    <button @click="deleteUser">Delete</button>
  </div>
</template>

<script>
export default {
  data() {
    return {
      user: {}
    }
  },
  mounted() {
    const userId = this.$route.params.id;
    const apiURL = `http://localhost:8000/api/users/${userId}/`;

    fetch(apiURL)
      .then(response => response.json())
      .then(data => {
        this.user = data;
      })
      .catch(error => console.error(error));
  },
  methods: {
    editUser() {
      // Navigate to the edit user page
      this.$router.push(`/users/${this.user.id}/edit`);
    },
    deleteUser() {
      const userId = this.$route.params.id;
      const apiURL = `http://localhost:8000/api/users/${userId}/`;

      fetch(apiURL, {
        method: 'DELETE'
      })
      .then(response => response.json())
      .then(data => {
        // Navigate back to the user list page
        this.$router.push('/users');
      })
      .catch(error => console.error(error));
    }
  }
}
</script>
This component retrieves the user details from the Django REST Framework API based on the id parameter in the URL (e.g. localhost:8000/users/1), and displays the user's name and email along with "Edit" and "Delete" buttons.
The editUser method uses the Vue.js router's push method to navigate to the edit user page (which would be defined in a separate component).
The deleteUser method sends a DELETE request to the API to delete the user, and then uses the router's push method to navigate back to the user list page.
良さそうなのでとりあえずcomponents/UserDetails.vueを作成してそのまま上記のコードを貼ってみます。
続いてVue.jsでのルーティング方法をChatPGTで質問しました。
入力
How can I above detail page in Vue.js application ? Should I install Vue Router? I want to know how to define routes in Vue.js.
出力
Yes, to create a detail page for a specific user in your Vue.js application, you would need to use the Vue Router. Here's a step-by-step guide for setting up and defining routes in Vue.js:
Install Vue Router using npm or yarn:
npm install vue-routeror
yarn add vue-routerCreate a new router instance in a separate file, such as router.js:
import Vue from 'vue'
import VueRouter from 'vue-router'
import UserList from './components/UserList.vue'
import UserDetails from './components/UserDetails.vue'

Vue.use(VueRouter)

const routes = [
  { path: '/users', component: UserList },
  { path: '/users/:id', component: UserDetails }
]

const router = new VueRouter({
  mode: 'history',
  routes
})

export default router
In your main.js file, import and use the router instance:
import Vue from 'vue'
import App from './App.vue'
import router from './router'

Vue.config.productionTip = false

new Vue({
  router,
  render: h => h(App),
}).$mount('#app')
In your App.vue file (or other root component), add the <router-view> component to display the appropriate component based on the current route:
<template>
  <div id="app">
    <router-view></router-view>
  </div>
</template>

<script>
export default {
  name: 'App'
}
</script>
ルーティングの設定を進める前にsrc/components/HellowWorld.vueをsrc/components/UserList.vueに変更しました。
続いて上記のChatGPTの回答に沿って進めてみます。
Vue Routerをインストール
npm install vue-router
router.jsを作成
import Vue from 'vue'
import VueRouter from 'vue-router'
import UserList from './components/UserList.vue'
import UserDetails from './components/UserDetails.vue'

Vue.use(VueRouter)

const routes = [
  { path: '/users', component: UserList },
  { path: '/users/:id', component: UserDetails }
]

const router = new VueRouter({
  mode: 'history',
  routes
})

export default router
vue-app/src/main.jsを以下の内容に編集
import Vue from 'vue'
import App from './App.vue'
import router from './router'

Vue.config.productionTip = false

new Vue({
  router,
  render: h => h(App),
}).$mount('#app')
vue-app/src/App.vueを以下の内容に編集
<template>
  <div id="app">
    <router-view></router-view>
  </div>
</template>

<script>
export default {
  name: 'App'
}
</script>
とりあえずここまで書いてnpm run serveしてみると以下のエラーになりました。
Compiled with problems:
×
ERROR
Cannot read properties of undefined (reading 'use')
TypeError: Cannot read properties of undefined (reading 'use')
Vue.jsはバージョン2系から3系に上がる時に破壊的変更が入ってるという話をどこかで聞いたことがあるのでその観点でChatGPTに聞いてみます。
入力
is there any problem related to Vue.js version 2 and 3 that can occured Vue Router use function?
出力
Yes, there is a difference in how Vue Router is used between version 2 and version 3 of Vue.js.
In Vue.js 2, you would install and use Vue Router like this:
import Vue from 'vue'
import VueRouter from 'vue-router'

Vue.use(VueRouter)

const router = new VueRouter({
  // routes configuration here
})

new Vue({
  router,
  // other options
}).$mount('#app')
However, in Vue.js 3, the Vue.use syntax has been replaced by an app.use syntax:
import { createApp } from 'vue'
import { createRouter, createWebHistory } from 'vue-router'
import App from './App.vue'

const router = createRouter({
  history: createWebHistory(),
  routes: [
    // routes configuration here
  ]
})

const app = createApp(App)

app.use(router)

app.mount('#app')
So if you are using Vue.js 3, make sure you are using the app.use syntax instead of Vue.use when installing Vue Router.
上記の回答によると、Vue2系と3系で書き方を変える必要がありそうです。vue.createAppをインポートしておき、useメソッドをcreateApp.useとして書けば動くようです。
ChatGPTの回答だとrouter.jsファイルに分けずmain.jsにまとめる書き方になっていたのでまずは同じようにmain.jsを修正してみます。
main.js
import UserDetails from './components/UserDetails.vue'
import UserList from './components/UserList.vue'
import { createApp } from 'vue'
import App from './App.vue'
import { createRouter, createWebHistory } from 'vue-router'

const router = createRouter({
    history: createWebHistory(),
    routes: [
        { path: '/users', component: UserList },
        { path: '/users/:id', component: UserDetails }
    ]
})

const app = createApp(App)
app.use(router)
app.mount('#app')
再度npm run serveしてみると想定通りにブラウザからアクセスできました。
localhost:8080/users

localhost:8080/users/1

正常に動くことが確認できたので、main.jsにあるルーティング処理をrouter.jsに移動してみます。
vue-app/src/router.js
import { createRouter, createWebHistory } from 'vue-router'
import UserList from './components/UserList.vue'
import UserDetails from './components/UserDetails.vue'


const routes = [
  { path: '/users', component: UserList },
  { path: '/users/:id', component: UserDetails }
]

const router = createRouter({
  history: createWebHistory(),
  routes: routes
})

export default router
vue-app/src/main.jsはrouter.jsからrouterインスタンスをインポートして、app.useに渡すように変更します。
import { createApp } from 'vue'
import App from './App.vue'
import router from './router'


const app = createApp(App)
app.use(router)
app.mount('#app')
この変更も後も同じようにブラウザからアクセスできました。 ルーティング処理はrouter.jsにまとめた方が見やすく感じるのでこちらの方が良さそうです。
次の記事でUser Detailsの画面から更新処理と削除処理を行えるようにしたいと思います。